Pictures

*** The pictures posted in this blog are my personal creations! I hope you enjoy! *** You can also follow me on FACEBOOK at www.facebook.com/forbakessake

Tuesday, May 31, 2011

A Tiramisu "pick me up"

Hello Everyone!

Happy Post Memorial Day. I hope you had a great weekend. I had an AMAZING one, it was so so so good to spend quality time with good friends. It gave me that extra push to make sure I make my way back home to South Florida and soon! 

When I left you on Friday Fun-day, ;) I mentioned I would give you the Tiramisu steps.  I will not go into the details of the recipe's unless you truly want them.  There are a lot of detail and it requires two recipes,  one for the lady fingers and one the for the Mascarpone filling. We actually made them on two different days.  :) BUT,  I am HAPPY to give themt to you, so please just let me know! :) The only reason I don't post them now is because I personally did not like this method of creating Tiramisu, but it was tasty nonetheless. :)

We first created the lady finger sponge cookies. I didn't get a chance to show you what those looked like after we baked them on Friday, so here you are!

They are pretty thin and taste like mini sponge cakes. Mini is in people!! :) We looove Mini! After you have made your Mascarpone filling that has yummy stuff in it like sugar, eggs, coffee extract, heavy cream and of course, the Mascarpone cheese :) :) , you then put it into a piping bag! Seriously, its easier to say all that than to type out the process of making the Mascarpone filling! I'm helping you... laughing! Ok fine!! I am being lazy.. can you give me just a slight breaky break? I promise to make it up to you tomorrow when I show you how to make an Opera Cake using Jaconde Sponge cake, French Butter Cream and Chocolate Ganache.  Ohhh now you are loving me??? I seeeeee  :)  Here is the filling my darlings:
Bamn! that baby goes into the bag.  You then get your containers where you want to build your Tiramisu. Wait!! Quick little tid bit for ya...Did you know that Tiramisu means " Pick Me Up" in Italian?!?! It has coffee!! And in most Tiramisu recipe's you will find it has that EXTRA special, ever so lovely, Yummy yum yum ingredient in it called ..... RUM! :) :) :) It's a beautiful thing, don't try to deny it ;).  If you do choose to put the rum into your Tiramisu, you will add it to your simple syrup that already contains the Coffee extract in it :). Doesn't that automatically scream DELICIOUS to you? It does to Meeeee....

Ok, back to the building blocks. Now that you have your tin or containers to build,  place the lady fingers on the bottom in a row. You can either dip or brush the simple syrup so the lady finger is drenched in it.Don't forget, simple syrup is equal parts sugar and water, add as much coffee extract as you would like, and then if you choose, put in your 1 or 2 oz of Rum or preferred liquor choice :) Dark Rum, Dark Rum, Dark Rum... just saying...

After you have drenched them as seen in the second picture above, you want to pipe in the Mascarpone Filling.


** Quick Tip** You can add Coffee Extract to your Filling if you wish, just make sure you do it at the END. Flavoring Agents GO IN AT THE END.  :) :) 

Repeat these steps two or three times as desired, ending with the Filling on top.  You then can decorate the top layer with a tip and sift a small amount of cocoa powder on the top!  There you go my friends, Tiramisu!

We started our Jaconde Sponge cake today in class and made our French Butter Cream which tasted DELICIOUS!  Tomorrow we will make an Opera Glaze and complete the Opera Cake. I have no clue what any of that is. :) :) Just being honest.. But guess what? Yea, I will find out tomorrow and share.

Good night to you all and I will see you back here tomorrow!

Off to look up at the moon I go!

XO


Thursday, May 26, 2011

Lady Fingers..working their way into becoming Tiramisu :)

Hello all!

Tomorrow is Friday Fun-day! :) :)  I have to give a MUCH deserved shout out to my besty Cindy for taking the time to make not just the Swiss Roll, but the Devil's Food Cake as well! Thank you so so very much for making those and for sharing your experience with me! It brought the hugest smile to my face. I am honored! I think its amazing and I am so glad you found it to be fun and relaxing! No matter what the result was. ;) The first time around is always difficult, but its practice that makes perfect.  You are awesome Cindy!  That means very much to me...

What a sweetheart!  My apologies for this being a little late.  We created the lady fingers that will be soaking up all our yummy Mascarpone Filling tomorrow! You got it, we are making Tiramisu on a Friday.  This kind of puts me in a jam, as I have a 3 hour drive back to my city, Miami Beach!!  I am absolutely VERY Excited as I am going to see some very special people. I can not wait.

But this is about baking, so lets bake! I have never been a Tiramisu fan.  Yes, for the obvious reason stated before :) I don't likey milk or anything white! Laughing.. Sooo, this is going to be dropped off before the road trip, that's for sure! The Chef said that a few ingredients may accidentally fall into our Mascarpone... and I hope everyone else's drops into mine too! Yes, liquor.. its a beautiful thing ;).  Hmmm, maybe if I close my eyes and not look at the COLOR, I can enjoy... yea! That's it. I am totally going to give that a try! Wish me luck, and no, at that point, I wont drink/eat and drive.  Although, my friend Lulu said the most adorable thing today. She said she thought Tiramisu was a drink. :) And although I do not doubt this is a drink in many a bar, it is still a baked dessert.. and one that is going to be devoured by plenty a classmate tomorrow. ;)

Let's get you the recipe in case you want to make this Latin lover.  To make the lady fingers, we used the same split-egg method as we used for the Swiss Roll. I didn't take a bunch of pictures for you today because I already took them for the Swiss Roll, so if you could kindly refer to that posting for the step by step photo option. :)

Ingredients

6 oz EGG YOLK
3 oz SUGAR

9 oz EGG WHITES
5 oz SUGAR
1/4 tsp LEMON JUICE

10 oz PASTRY FLOUR

Remember, you are whipping those yolks until you see them rise and then gradually add in the sugar. Whip until you get to the ribbon stage.  The in a separate bowl, whip the egg whites, gradually adding the sugar, and whip to a medium peak.  Start to fold in your pastry flour, in thirds, into the Yolk mix, alternating with the whipped egg whites... End this process with egg whites as the last thing you fold in. Incorporate your lemon juice and pipe these babies onto  your sheet pan!  They need to go immediately into the oven at 375 degrees F.

These bake fairly fast. You do not want them to have too much color, just a faint shade. Cool them off and you will be ready to create your Tiramisu. :)

I am not sure if I will have time to send you a posting for tomorrow's Tiramisu, BUT, I do promise to post it for Monday as it is Memorial Day and we do not have class.  Remember, this is not just a day off! This is a day where we remember those individuals who died serving our amazing nation.  Please take the time out to remember why we have the great freedom and rights that we do.

I hope you have an amazing long weekend! Enjoy the sun, enjoy your friends and family and I will see you back here before you know it!

Take good care,

Linda

Wednesday, May 25, 2011

Fun making Carrot Cake

Today we put together this pretty little lady.  :) There are a million recipe's for Carrot Cake so if you have one that you love, hold on tight to it! I think this one tastes pretty good, but not SPECTACULAR.  Again, this is one of my "complaints" from going to school. I don't think we have made anything that I feel I would create in a bakery. That's pretty sad!  BUT, I am going to have to come up with my own recipe's and ingredients to make sure that I do give you something that really is, Linda's!

We created our Cream Cheese frosting which I was excited for. I love anything with Cream Cheese :) :) So I guess I am a little biased, because I feel, how can you go wrong? yuummy! Ok, so here you are:

Cream Cheese Icing

12 oz CREAM CHEESE
20 oz POWDERED SUGAR
VANILLA to taste
LEMON JUICE to taste

Mix that up in your mixer starting at low speed and gradually get it to a higher speed, making sure all the ingredients get incorporated. Use your spatula to scrape down the sides and to get underneath the paddle attachment.

Once you have your icing ready, take your cake out of the fridge and cut it in half. Place a layer of icing on the first half of the cake and then place the top back on. Ice the rest of your cake by placing a good amount of icing on the top, using your spatula to even it out.  Go all the way around the cake, as smooth as you can.  This cake has a lot of crumbs, so you can try to do a crumb layer, cool it in the fridge, and then come back and finish icing so you get a smooth finish. That's what I did! It's frustrating when you are diligently working and those crumbs jump right into your smoothness!  So here is a pic for ya!
Once you have that done, move on to my all time favorite thing.... piping and decorating!! haha.. yea, right. Okay, I must admit, today we created little carrots that we made out of marzipan. It was like playing with play dough. :) So here is the thing,  I don't really think I am creative, but if you show me how to do something, I will practice and get it right.  Does that count for anything? laughing.. I mean, I know it does, but I just wish I had a more extensive imagination!  So, we placed the classic rosettes on top. These serve as slice markers actually.  I did 8, but you can totally do more slices.  If you do 8, its basically the size of a slice you would get at a restaurant..which is, in my opinion, TOO MUCH! I put a little seashell piping on the bottom, but you can get creative with your favorite style.
I then shaped the carrots using the orange and green dyed marzipan. This part was fun!! I didn't think I was going to like it, but I sure did!  I placed a carrot on each of the rosette's and then did a little something of my own in the middle... I made a rosette and put a couple of green "leaves" in the middle as if there was a carrot growing from it! laughing.. HELLO!!! How about a little bit of orange BEFORE the green leaves so that it actually looks like there is a carrot growing out of it?? Yea, like I said.. creativity challenged. ;) ;)
I finished this a little too quickly and had too much time to kill. We had a lot of marzipan left over so I decided I would kill some of that time. Yup, I got "creative".  The chef walked by though and said she thought it was very cute! Woot Woot! Gooo  Linda!!  She was pleased.. so I was pleased!
Ta Da! There you have it! :) :) Listen, I try ok?!? We are just going to cut into it anyhow, right? It must be devoured right away, so chop chop!
Tomorrow we make lady fingers and will more than likely be doing a lot of piping exercises.  We make Tiramisu on Friday and will use our lady fingers for that.  So I may not have too much to show tomorrow, but I will give you my insight anyways!

Have yourself a beautiful night and I will see you back here very soon! I am off to get a little work out in. Lord knows all this cake is going to the thighs, ok, and stomach, arms.. need I go on? ;)

XO

Tuesday, May 24, 2011

Devil's Food Cake in honor of my brothers birthday!


Hi,

Its Tuesday already! Sheesh!! Slow the roll please! First the world was coming  to and end and now time just wants to fly on by like nobody's business!  A girl cant get a break around here. I will tell ya what though, I can get some cake around here! :) And GOOOOOD ones too!

A big happy birthday shout out to my brother Davey!! Love you!  Will see you here tonight for a celebration!

Here we go! Devil's Food Cake so you can go and make your own!

Ingredients:

12 oz CAKE FLOUR
2 oz COCOA POWDER
.25 oz SALT
.35 oz BAKING POWDER
.25 oz BAKING SODA
7 oz SHORTENING

16 oz SUGAR
8 oz SKIM MILK
.20 oz VANILLA EXTRACT

6 oz EGG
80z MILK

You will create this using the TWO-STAGE method.

In your mixing bowl, place your 5 dry ingredients listed first in the recipe as well as your shortening. Start to mix this baby on low speed so that the ingredients don't go flying everywhere resulting in a beautiful cloud of flour in your kitchen. Lord knows "pick up" is always the fun part of baking. ;) Riiiight.  Scrape down and continue to mix, but not too much.

Slowly add in the best part of the cake, the sugar! :) Dont just throw it all in there either, give the cake some love and place it in there nice and slow. :) Like good ol' Freddy Jackson sang it. :) :)  Mix at medium speed. You will get a dirty sand looking mixture when its all incorporated.

Slowly add the milk from the 2nd portion of the recipe above. SLOWLY my loves, there is no rush in baking :). Mix this on low speed. Once you have incorporated that in,  you will then move into the 2nd  liquid stage.  So add in the additional 8 oz of milk from the 3rd section of the recipe, also SLOWLY, keeping your mixer on low speed.

Once you have incorporated all the liquid, slowly add in the eggs in a steady stream.  Once that is in, add your flavoring agent.. the vanilla! Let that baby mix for just a tad bit longer. You don't want to over mix and you don't want to build too much gluten into this product either.

This  batter is of a soupy consistency.  Once you are done, immediately put these into your sprayed and floured pans and bake at 375 degrees F.

Top this with your favorite cream, we chose Chocolate Butter Cream :)  and cut it up and enjoy with a big glass of milk.. water for me, though. :)  To die for!  That's it! You are done!  

We created a carrot cake today in class as well. This school continues to blow my top.  One of the major ingredients of a carrot cake are the walnuts... yea, they didn't have any. That didn't stop our group from having them though! Our trooper, Andrea the beautiful, got us some on the double!! So we were able to add t hem in and tomorrow I will let you know how that came out. Delicious I am sure.  I LOVE carrot cake..but I have a feeling this one is going to be one of the best I have had. The batter tasted amazing!! Yes, I love batter. I will let you in on a little secret.. i like batter more than i like cake. Oh yea!! There you have it!  Bamn!

Laughing.. I'm off to do some party planning! I will see you guys here tomorrow!

Ta Ta for now and let me know if you make this! I want to make it with you!

XOXO

Monday, May 23, 2011

Better late than never!

Hi!!

Happy Monday! I am so sorry that this is late.  Today after class I escaped to the beach with my sister.  A girl has to play ya know.. life should be all fun and games. :)

Today was a prep day. We made our Devil's Food Cake.. yes, you know it! Chocolate! :) And we also made the chocolate Italian Butter Cream to decorate for tomorrow. So there really is not much to show you today as it was a pretty busy day from start to finish.

Devil's Food cake is made by using the two-stage mixing method. Which means you will put the liquids in to your creation in two steps.  I believe I have already covered the creation of this cake in my Basics class so please look back in the archives for February and March and you are sure to find it under that same exact name :)

So, this weekend I went to a wedding showcase with my girls. Thank you Noemi!  And no, before you start getting all crazy, it was absolutely not for me!  It was for my brother's fiance and for my cousin's fiance who both have weddings early 2012!  As I was walking around, being a cheerleader, I ran into a couple of cake booths and I grabbed their cards.  :)  I have to get cracking on solidifying a place to do my externship so I look forward to calling them to see if they are open to having FREE help!!  I think its VERY silly that I have to pay thousands of dollars to a school , to turn around and have to do a 6 week externiship for no pay.  Laughing.. absolutely stupid.  I will just add it to the list of stupid things going on in my life.  Check, Check and Check!  Laughing it all off!

On a better note, I had a talk with the chef today. I inquired about why we are creating the same cakes we made in Basic Techniques!  Looks like this class is based on showing us all the cake methods. You think they would come up with other cakes for you to make, instead of continuously making the same ones! BUT, who am I ? Just a mere student.  ;)  The next course, wedding cakes, is where we learn how to create the types of cakes  we'd decorate and sell.  Soooo, we continue on our journey! I'm trying my best to get us there! And I know we will get there all in one piece. Piece of cake ;)

I will see you back here tomorrow with notes on how to build your Devils Food Cake and decorate it!

Good night to you!

Me :)

Friday, May 20, 2011

Swiss Rolls

Its Friday!! I honestly can not believe how fast this week flew by!  I hope everyone had a great day.  We got into class and started to work on this sweet treat. 

Swiss Rolls:

12 oz Egg Yolk
8 oz of Sugar

12 oz of Cake Flour

1 lb 2 oz Egg whites
.25 oz Salt
6 oz Sugar

We are going to use the split method on this. Literally :) start splitting all of those eggs and separating them! We had to do this at twice the ingredients that I just gave you... ewwy.. I sure don't likey the smell of eggs! But I don't mind playing with them ;).  Anyhow, you are going to be  whipping your yolks and sugar first, then your egg whites and sugar, and then you will incorporate your dry ingredients into your yolk mixture while alternating with the egg white mixture as well. 

Lets get the party started!  In your mixer, put in all of your yolks and whip them on medium high speed. After you see some volume in the eggs, lower the speed and slowly incorporate the sugar. Once all the sugar is in, you will put the mixer back on high and whip until your mixture thickens and leaves you at the ribbon like stage.  At this point you want to place this yolk mixture into a large bowl.

Clean your bowl completely so there is no trace of any yolk.  Throw in the whities :) :) and whip on high speed until you don't see any clear egg on the bottom. Lower your speed and slowly add your sugar. Whip to a medium peak.

Ok, have you had enough of egg yet??!? I have! But lets keep going.  Take your egg yolk bowl and gradually add in the cake flower in thirds.
Fold that baby in, making sure not to MIX. Just FOLD. Once it is incorporated, you want to then add the egg whites in thirds as well.
Fold the egg whites in. You will see the batter rise since you are adding more volume to it with the egg white mixture.
Once you have added the other 2/3 rds, you will be where the above picture is at.  See that volume! Awesomeness. We have to get this baby straight onto the pan and into the oven. We don't want to lose all this volume we have worked so hard to create. :)

Grab your sheet pan, place parchment paper on it and then pour the batter to HALF the height of your sheet pan. You don't want this sponge cake to rise too much! We are gonna roll it later, if it's too thick, it will be that much harder to get a swirl. And if you are a girl, you know its all about the swirl!
Bake at 420 degrees F for about 8-10 minutes or until the cake springs back from your touch.  Cool this down and then flip it over, remove the parchment paper and lay flat. Spread your jam, chocolate, Chantilly cream or nut creation, whatever you want, and spread it thinly on the cake.
We used strawberry jam. :) As seen above you want to take the base layer of the cake and start to roll. Once you get the first roll going, you can then continuously roll it until the end. 
Wrap it up in parchment paper and place it in the refrigerator to cool! Once its cool you can cut up into little spheres and serve.
 
So, there you have it! I hope everyone has a wonderful weekend. I am off to spend some quality time with my family and have lots of fun! Let me know if any of you try to make any of the cakes or if you want a recipe for any particular cake. I would be more than happy to share with you!
 
In the meantime, no matter where you go or what you do, please be safe. As you know, the world ends tomorrow! laughing... which hey, it may be true, just remember that on Sunday, a new world is starting :) :)
 
Night night!!


Thursday, May 19, 2011

Who says a Cake can't get drunk? Mine did.. Black Forest Kirsch Cake

Yup, we made it again.  Except this time we made it differently and dare I say, more effectively. This little boy may look innocent, but don't let him fool ya, he is DEVIOUS!  This is the German Black Forest Torte. Torte is German for Cake.  It traditionally has 3 layers, filled with Chantilly cream and cherries and masked with Chocolate shavings.  In Germany, their Chantilly cream is not as sweet as we make here in America. I guess another reason to love America ;) . Sweeter is so much better :) Sorry Max! :) :)

So let me get you started. We took our DRY Chocolate Genoise cake :) that we made yesterday, out of the cooler. We beheaded the poor guy so we could work on an even surface :)
We then marked our cake with our knife, marking the spot where you will cut all the way through. We did 3 layers so we had to cut twice. I am getting MUCH MUCH better at cutting it as I wanted to just saw through the cake.. come on Linda, just cuz its a Forest cake doesn't mean you are gonna go at it as if it was a tree trunk... Its hard to differentiate. I am a nature girl! Nut'n left to say :)
Turn the table as the knife gently glides through the center of the cake from your outer marks.  Once you have your two layers off, you want to dab on either simple syrup or the juice from your cherries. Now, here is where we got a little crazy.. "We", as in Andrea and I. We already had the juice from the MEGA drunken cherries, we poured in our Vanilla Simple Syrup from yesterday, and then we added about ...shhh, don't tell, but we add 2 oz of Kirschwsser Liqueur. Tee Hee...

Quick Tip for ya!  Use 1 oz of liqueur for every 8 oz of Simple Syrup when dabbing onto your cakes for flavor and moisture.
Now you are ready to start building your cake. For the Forest Cake you will create your Chantilly cream which is easy to make. Take your mixer, pour in a quart of heavy cream, add in about 6 oz of powdered sugar and vanilla to taste and whip on high until you are at a soft peak.  Cool for about 10 minutes and then put some into a piping bag and use it to fill your cake as we did here, in circles. Once we finished with the cream, we added in our Drunken Cherries :)
You will do the same steps for your next layer and then you will GENTLY press down on the top cake, so that all your inner filling doesn't come out of the sides.

Yea, seriously, I just showed you a picture of gently pressing down on a cake.. I mean, could you ask for anything more?!? :) Spoiled I tell ya! Ok, so now take your Chantilly cream and put a good amount on top. You will work this from side to side, letting the extra cream drop to the sides.

Continue to cover the sides with the overflowing cream and create your crumb coat. It does not matter if crumbs show through on this particular cake because you will be masking the sides with the chocolate shavings. Yes, i said it, Chocolate! Say it loud and proud!
You then want to take your star tip and pipe out Rosettes on the top of the cake as decorations, place cherries on each rosette and place a larger one smack in the center, decorating with large Chocolate shavings. Here is mine!
I named him Chappy.. :) You can figure it out right?? If you cant, then you have to think like a dork, and then maybe you will get it! laughing.. I cant help it.. I'm cheesy sometimes.  Cant we just considerate it a CUTE characteristic? Sheesh!

Chappy is now at my brother's house letting that alcohol settle in. I cut a piece for you so you can take a bite out of crime!  Ok fine, no more corniness.. here you are and have a great night!


Wednesday, May 18, 2011

Building a Chiffon cake with Strawberry Filling

Hiii!! Hello :) Hola! Ciao.... Yes, can you tell I am planning a trip and am trying to figure out my destination? My heart tells me Italy all the way, yet I want to go to Paris too. But then I want to go do something adventurous where I can hike, and trek and jump and be on top of the world! Who knows.. Im still figuring it out! BUT, this is not about me.. this is about CAKE! And what a great thing THAT is...

Ahh I could have come home with this cake yesterday and I would have been so happy to hand it over to my pops for his birthday. Boo freaking Hoo.. laughing! This thing actually tastes amazing! I say that because you already know I have been disenchanted with this class, making cakes we have already made in the past. BUT, each instructor teaches differently and I am being open to it, trying to take in any new tips as we go along. Tips of course, that I will be sharing with you.  ;)

Lets get started. We made out cakes yesterday and we took them out of the cooler today. We took the top brownish part of the cake off with our fingers, just rubbing it off.  The Chef took hers off with her knife as seen below.  We then put the cake on our turn table and began to mark the spot where we wanted to completely cut through the cake. We did this by cutting around the cake slightly with the knife. 
Once you have made the mark, you then proceed to insert the knife into the cake and turn the table while letting the knife cut through the cake.  You will then remove the top and place your choice of filling into the cake. I chose Strawberry :) I wont go into how much I lovey strawberries. Ok, maybe just for a little bit. I'm kidding. ;) Ok, maybe I am not. I love fresh strawberries, organic preferred :) . Cut those babies up and throw them in a bowl with some blueberries.. Mmm Mmmm delicious! I take THAT over cake any day! Am I allowed to say that? :) :) Let's get back at it! 
Place your top back on after you have spread the filling and dab with a little sugar and water mixture, or what we call Simple Syrup. :) Equal parts sugar and water. To this mix, you can add alcohol if you so choose.. I chose but didn't have it on hand! laughing! Oh well, now I know to carry a bottle with me in the vehicle ;).

You then want to take the Butter cream you made and cover the entire cake making sure you have even lines.  We had a choice on how to cover the cake. I chose to use a cake comb and make lines across the sides. I masked it with crisp hazelnut pieces, and then piped out the Rosettes and Sea shells that I so hated doing on Monday :) Thanks Angela! I did practice! These came out pretty good..

That is the top view. My Sea shells covered the hazelnut mask on the bottom because this is what the Chef did in her demo, so I just followed directions. What a good little student I am. Tee Hee.. riiiiight.  I really want to be rebellious. Oh who am I kidding, I am rebellious, it just so happens that it has to be underneath my breath. I am an opinionated kind of broad and that's not allowed so much in class. :) :)
There you have it! I wish I could have taken more pictures for ya but I hope you can get a little understanding from these.

We made our Chocolate Genoise cakes today as well and put that in the cooler for the Black Forrest Torte we are going to make tomorrow. That one WILL have alcohol in it :) The Genoise is a dry cake, so I think we will add some extra moisture into that sucker.. a little Brandy anyone!? :) :)

Have an amazing night! I am off to have a drink with my sister and some friends and get my nails done. :) Gotta look cute ya know...

Take care of you!

Tuesday, May 17, 2011

Chiffon Cake with Swiss Buttercream production day!

Hello, hello :)

Happy Tuesday to everyone and a very special Happy Birthday to my daddy! :)  As soon as I am done here I am off to bake him a cake! :)

As I mentioned yesterday, we made Chiffon cake with Swiss Butter cream as its topping.  We have already made this back in the beginning of our baking journey so I wont go into great detail today but give you more of a step by step. The original instructions are back in my February postings. 

If you recall, the Yellow Chiffon is a sponge cake.  It is a two-stage process cake where you take your sifted dry ingredients ( Flour, Salt, Sugar and Baking Powder) and incorporate the wet ingredients (Oil and Water)  into it in thirds.  You will mix it in your bowl with your spatula gently, making sure not to create too much gluten. Once you have all your wets in, you then add in your egg yolks and vanilla, mixing them in until you have a smooth batter.  Once this is done you set your creation aside and begin to work on the second stage. Don't stick your finger into this part of the batter just yet, I promise you it will not taste yummy :). Yes, you know who you are. ;) 

Grab yourself a small bowl.  ( This is the best part, making the mess) :)  Mix your sugar and cream of tartar together, breaking up any lumps. Place all your egg whites into your mixer and whip those babies on medium speed until you no longer see the clear eggs on the bottom.

** Quick tip for the day:  Use room temperature eggs as they result in more volume! The warmer they are the more relaxed the eggs are and you can get more stretch from them.

Ok, so at this point you want to put your mixer at a low speed and add in your sugar and tartar mix, doing so in thirds. You don't want to dump all of it in at once so lumps do not form and also, you don't want it all to sink to the bottom of the mixer!  Once it's all in, turn your mixer back up to medium speed and wait for the product to whip until you have a "captain hook" foam tip on your whip attachment when you pull it out to check.

You now have your two stages! Whew! We are almost done! Now you want to FOLD in your whipped egg white mixture into your previously created batter. Make sure not to mix or whip it, just fold it in so you create more volume. Do this until its nice and evenly distributed and you see no remnants of egg batter. You want to get these into the oven as soon as you can so the batter does not lose its volume while it sits there, because that's exactly what it will do! Sheesh, you think it would have a little more respect after all the hard work you are putting into it right?  But hey, you cant always get what you want. Its a temperamental little sucker.  You want your oven to be at 375 degrees and the likelihood is, it will be there growing and playing for 30 minutes. :)

As your babies bake and grow to awesome loveliness, go ahead and start your Swiss Butter cream!  Take your egg whites and sugar and put them over a double broiler and stir until the sugar is completely dissolved.  Once dissolved, put it into your CLEAN mixer :) :)  and whip it on high speed! Ahh this is the fun part, you get to see it become a thick white consistency.  Once the egg strands have stretched and it is nice and thick, take your mixer down to low speed and begin to incorporate your butter into the mix little by little until it is all gone. Add in  your flavoring agents, which are vanilla and lemon juice (optional).  Whip it on medium speed for a few seconds so all the liquid is consumed by the whipped cream and you are done!

Once your cakes are ready, cool them and then you can decorate them with the butter cream.

Tomorrow we will be putting this together as we did back in basics. We will cut our cakes in half, fill them in the center with the butter cream and maybe some type of jam and decorate them as well.

We will be making an ever so tasty chocolate genoise tomorrow too!  This will serve as the cake for our Black Forest Torte. Yes, we have already made this as well! I am  not sure what the purpose of this is, but I am going along with the program :).  Who am I to complain, I really dont even have the energy to do it! :(  But to tell you the truth, it's not like either cake tastes horrible, they are actually delicious, smooth and light!

This class is a bit hectic, we are also in groups of 4 for now. I did not get a chance to take the camera out for a second to try to capture the shots for you, but I will TRY my best for you tomorrow and will most definitely be giving you pictures of my finished product! You can always count on that!

Enjoy your evening... I will be baking up a storm downstairs!! I am going to make some Palimers for the pops as well as his birthday cake!

See you back here domani!! Thank you again so much for hanging with me!

Ta Ta for now...

Monday, May 16, 2011

First day of Cakes Class....

Good afternoon everyone,

I hope you had a beautiful weekend. I had a very productive one.  :) I did loads of manual labor! laughing.. Yea, I don't do much of that kind of stuff, but hey, it helps keep the mind off of a lot of other things, right? I spent some quality time with my dad, so it was well worth it. Just one of the benefits of living back home.  Its his birthday tomorrow so I am hoping to bring home an amazing cake! :) :)

Today we started the first day of our 4th class, International Patisserie, Cake Formula's and Assembly.  I must admit, I am a little disappointed. We have 40 people in our class and I didn't really like our Syllabus either.  We are re-doing the majority of the cakes we already saw and created in our Basics class 12 weeks ago.  I hope that this is not the case and that we create something new or learn different ways to create those previously learned items... We shall see! Thus far, I am not a happy camper. This isn't a good sign! :(  I am going to work through it though. There have to be lights at the end of all these tunnels!!

With that in mind, we proceeded to do lecture on cake methods.  We then created a Simple Butter cream in order to practice our piping skills. We are learning two of the basics, Rosettes and Seashells, but we must perfect them! This is not our decorating class, but we need to have these basics in order to decorate the cakes that will be made in this class. They will be a part of our grade on Practicals for sure!

Needless to say, I'm having my issues ;).  Being artistic is not really my thing. I get really frustrated and really just want to set the piping bag down and surrender!! :) :)  I mean, cant we just pay someone to do those things?  ..... Wrong answer, I know. I need to learn it so I don't have to pay someone to do it for me.. Uuugghh... no likey!!

Tomorrow we will make Chiffon cakes and the Swiss butter cream to decorate it with. I will let you know how it all goes. 

I am ready as can be so I hope the challenge awaits us! 

Enjoy your night and I will see you back here tomorrow!

Take care of you ,

Linda G

Thursday, May 12, 2011

100% ... we have ourselves our 3rd "A" .. wooo hooooo

Happy Thursday to all....

A break could not have come at a better time, that is for sure! We Aced our test today! Yeay... 100%.  I try to aim high...even if sometimes I get a little short changed in other aspects of my life.  It's all about putting your head down and making sure you don't let anything get in the way, right?  That is where we are at my friends.

Moving on to cakes come Monday morning! This is it.. this is what I have been waiting for. What I learn in the next 12 weeks will determine the route I plan on taking with this life journey of mine....uhh hmmm, OURS I mean, sorry!  I hope we absolutely love it! :) Linda's Bakery will depend on it!

I promised I would give you the Brioche recipe yesterday and I am following through! You can make this as a savory or sweet bread :) You can also shape and score this dough any way you want. Maybe you would like to practice a braid, or fill it in a cute oven safe container that has ruffles so the bread comes out in that form.. whatever you decide, enjoy!

Brioche Recipe

8 oz MILK (80 degrees)
.50 oz INSTANT YEAST
1 lb 4 oz BREAD FLOUR
.50 oz SALT
3 oz SUGAR
5 oz BUTTER
5 oz EGGS

Use your 12 stages from weeks 1-3!! If you don't know them, they are in the blog about 6 weeks from today's date. Check out my April blogs, you are sure to find them in there. You may run into something yummy to make in addition to the Brioche :)

I wish you all a beautiful weekend. I will see you back here on Monday. Go out and smell the roses, they are LOVELY!!

Take good care of you....

Wednesday, May 11, 2011

Apple Strudel and Pull apart Brioche bread......

This was our last project in Breads class.  The time consuming and messy Apple Strudel. :) I think this may have been my favorite demo thus far in the Breads class.

I have a test tomorrow so I am going to briefly explain the process. Sorry!! You know I have to aim for our "A"...

So we made this sticky dough yesterday and we let it sit in the cooler over night.  To create the Strudel you will put a table cloth on your table, cover it with flour.  Take your dough from the night before and place it in the center
You will then want to tag team and pull this baby out making sure not to rip the dough, it is fragile. We use the big sheet pans so we made it slightly under the size of the sheet pan as seen here
Awww look how delicate these pretty girls are :) Hi LuLu, Hi Andrea. Once you have spread out the dough, you then want to take your streusel and put it along the left side of the dough where the filling of the Strudel will be.. Then sprinkle butter all along the rest of the dough.  After the butter, sprinkle streusel on the rest of the dough, but not as much as you placed on the left hand side for the filling.

Then you will take your apple filling creation which consists of peeled and sliced apples, nuts, raisins, cinnamon and sugar, and you will place it on top of the Streusel filling portion.

Drizzle a little of the liquid from the creation onto the filling, but not too much. This creates a caramel inside.  Once you have placed all your filing on to the dough, you want to fold in the bottom and top of the dough onto the filling, like you would a burrito :)
Bring the left flap in, and then roll all the way to the end. You will have some extra dough at each end of the "burrito"/dough.  You can cut this off , making sure not to cut into the filling, or you can leave it on and cut it off after baking.  No need to waste yummy dough.  Once rolled up, put plenty of butter on top and throughout the entire creation

Looks like a little whale! Haha... awww..our baby!!!  Stick this in the oven at 400 degrees for about 45 minutes or until golden brown on top.  Cool and cut and enjoy!! This was the first time I actually enjoyed a bread product COLD vs HOT!  I loved it. It was yummy.  But I can not have too much. I need to watch my figure ;)

We also made Brioche using the pull apart loaf approach... I don't have time to go into it now, but this was the result

Mmmm Mmmm... they were good. The dough balls were rolled in cinnamon and sugar and placed in the tins.  We proofed them, then baked them off at 375 degrees.

I'm so sorry I have to run! I literally need to go for a run and then get right back to study for our last exam. Tomorrow is just a clean up day and a test taking day, but I will come back to explain the Brioche and give you the recipe in case you want to try these at home!

Enjoy your night! Wish me luck...

Be back tomorrow... and then next week.. LET US EAT CAKE!!!!

XOXO

Tuesday, May 10, 2011

Spanikopita Mmmm Mmmm!

It was a Tasty Tuesday indeed ;). And my loved one's wonder why I don't eat breakfast or dinner. I had these babies for lunch!! They look like turnovers, right? They are, but they are not filled with apple or any other sweet yumminess. ;)  This is Spanikopita. Its my understanding its spelled Spanakopita, but hey, this is the name the Chef wrote on the board and in this class, i am just a squirrel trying to get a nut. The nut being the education of course.  Although, I'm not quite sure I want to be compared to a squirrel. Next time I will rethink what I type. :)

Phyllo dough is used to create these beauties.  The Spanikopita consists of Feta cheese, spinach, garlic, onion and cut up herbs and salt. It was a party in my mouth. :) Can I say that on a blog? Hmm , well, if I cant, I am truly sorry. But i love spinach, and anything that has garlic. Automatic winner in my book.

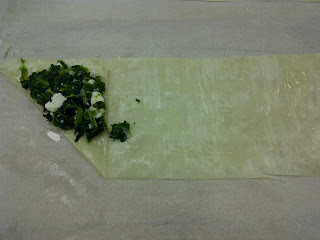
Here is how you make it.  Take your Phyllo dough out of the box and unwrap. Place a damp towel over it so it does not dry out on you while you leave it out. You will start with your first sheet, butter it down, just like we did using the baklava. Put a second sheet on top and butter as well. You will do this for a total of 3 times. 


Then you want to cut your Phyllo into equal strips. Mine were 3" strips. Create a triangle by bending in one side and placing your filling on it.  

Now fold the triangle over and place butter on top.
You will continue to bend the triangle over and butter as you go down your strip, sealing in the filling so that it does not come out during the baking process.  The butter is what creates that crispy texture.  When you get near the end, you want to make sure you end it with the extra Phyllo on the bottom of your turn as seen below.

Cut the excess Phyllo off and you are done. You don't need to tuck this in anywhere, just top it off with butter and set it on your sheet until all your creations are done. :)
Mega easy :).  Bake these at 375-400 degrees F.  These make amazing appetizers.  I created a few with Guava paste in them as a dessert and took them home to my parents who truly enjoy these.  We were able to bring the rest of our dough home, so at some point this weekend I will make some surprises and see what I fill them with. Don't ruin it Cindy and Ginny, by letting them know CHOCOLATE is going to be one of the surprises... ha! surprise!?!

Have a great night. Off I go to burn off the "Spani". :) You know I wasn't going to continue to call it that extra long name....

Hasta Domani... our 2nd to last day in class!

XO